Create a Next.js App
The Next.js plugin generates an opinionated web application using the following key technologies:
- Framework: React 18 + Next.js
- Styling: Plain CSS or Tailwind CSS
- Linting: Code Shaper ESLint configuration
- Component development: Storybook
- Unit testing: Jest + React Testing Library
- API Mocking: Mock Service Worker
You can add additional libraries and frameworks depending on your needs.
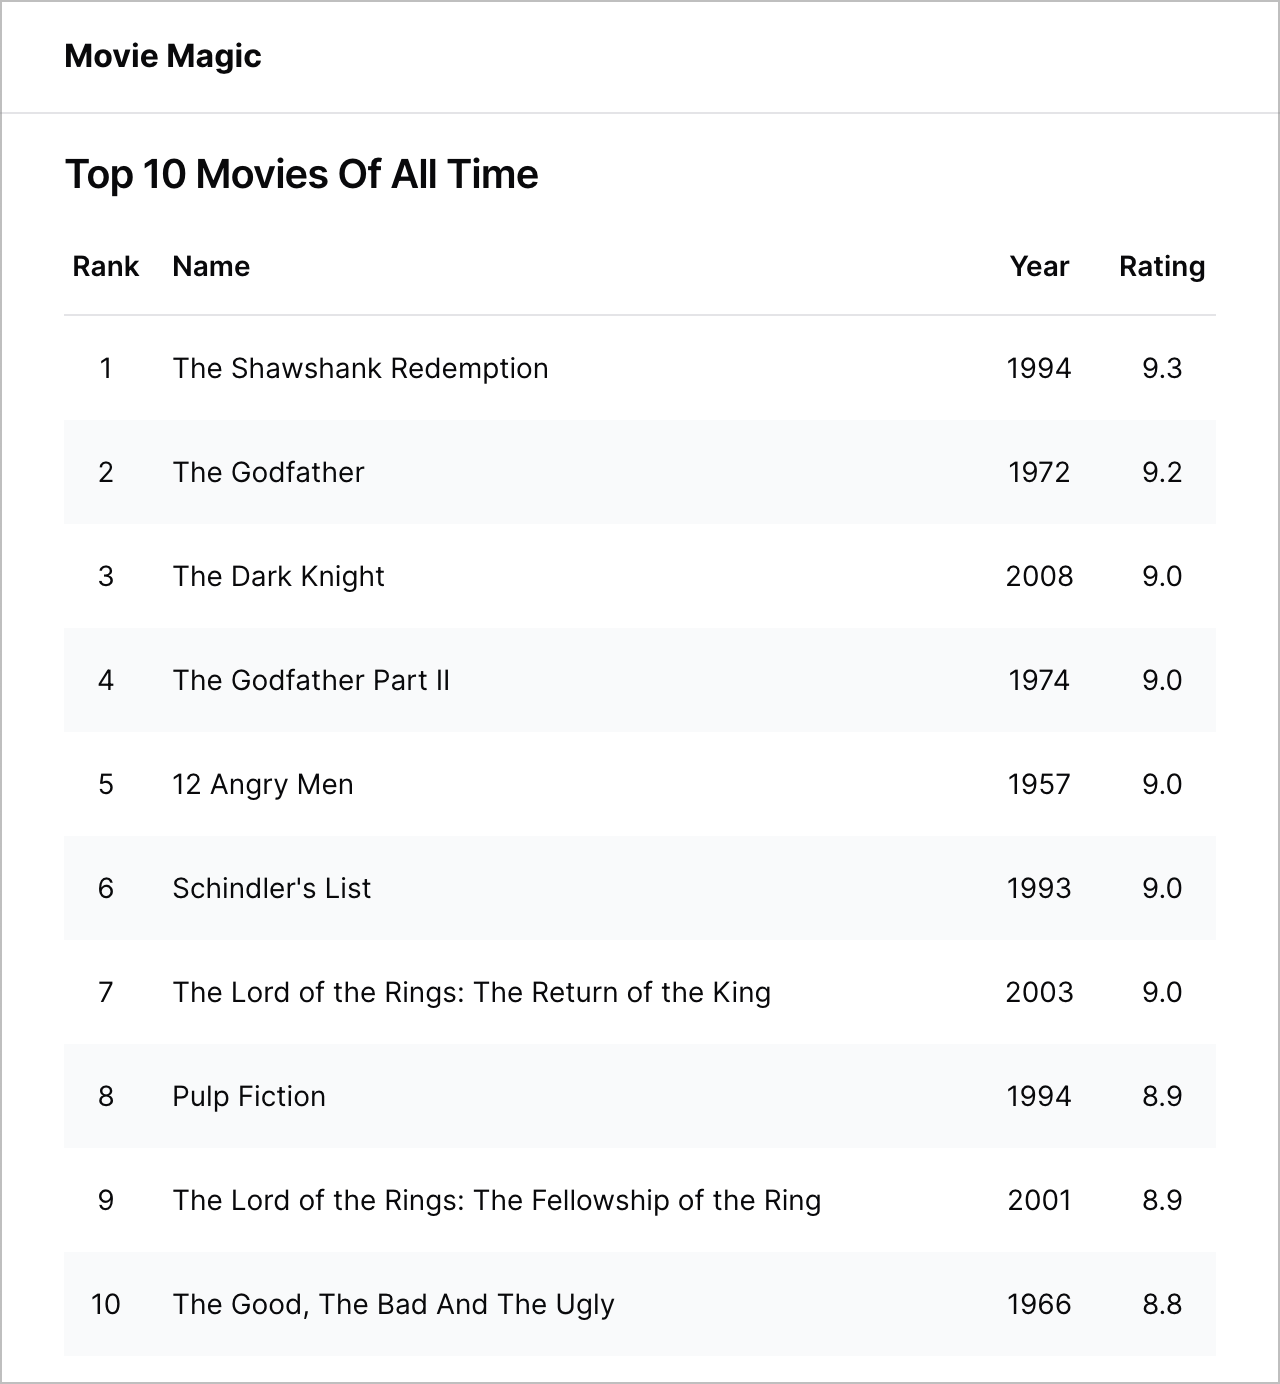
This section provides basic instructions for generating a web application using the Next.js plugin. We'll then show you how to extend this application using additional generators and popular libraries. The final application will show a list of top 10 movies as shown below. You can find the completed example here.
Prerequisite
Make sure that you have the movie-magic repository set up as described in
Create a new repo.
Install Next.js plugin and generate an app
Install Code Shaper plugin for Next.js.
npm install @code-shaper/nextjs
Now generate a Next.js application. By convention, applications are created in the apps directory. Let's create one there.
npx shaper
? Which plugin would you like to run? Next.js
? Which generator would you like to run? app
? Application name? movie-magic-nextjs
? Parent directory? apps
? Package name used for publishing? @movie-magic/movie-magic-nextjs
? Would you like to use Tailwind CSS? Yes
Now execute the following commands for further setup and commit of all changes:
# Create a local environment file for movie-magic
cp apps/movie-magic-nextjs/.env.example apps/movie-magic-nextjs/.env.local

# Install dependencies:
npm install

# Build and run the app to make sure it works
npm run build
npm run dev

# Point your browser to http://localhost:3000/.
# You should see the running app.
#
# Note: If you have another app in this repo that
# runs on port 3000, you should change the port for
# this app in `apps/movie-magic-nextjs/package.json`.
# Search for `3000` and change it to something else.

# Run Storybook to make sure it works
npm run storybook

# Point your browser to http://localhost:6006/.
# You should see the running Storybook.
#
# Note: If you have another Storybook in this repo that
# runs on port 6006, you should change the port for this
# Storybook in `apps/movie-magic-nextjs/package.json`.
# Search for `6006` and change it to something else.

# Commit
git add .
git commit -m "chore: add movie-magic-nextjs app"
The app is now ready to customize to your needs.
Extend the application
Let's see how we can extend our application to show a list of top 10 movies using additional generators and some popular libraries. Run the following command in the root directory of your repo to install the libraries we will use for this example.
Do not run npm install or npm ci in any of the subdirectories. It will break
the build. There should be only one package-lock.json file in the entire repo
(at the root). See
Turborepo docs
regarding this.
npm install clsx axios @tanstack/react-query --workspace @movie-magic/movie-magic-nextjs
Here's a short explanation of the libraries we installed:
- clsx: A tiny (239B) utility for
constructing
classNamestrings conditionally - axios: A promise-based HTTP Client for node.js and the browser
- @tanstack/react-query: Asynchronous state management for React, providing declarative, auto-managed queries and mutations
Create TypeScript definitions
Let's start by creating TypeScript definitions for data structures that we will
need in our app. Copy the following 4 files from
the completed example
into your apps/movie-magic-nextjs/src/models folder:
index.tsMovie.tsPaginationInfo.tsQueryParams.ts
When copying files from the completed example, do take a minute to understand them. They are well commented, so it should be easy to understand what they are doing.
Create a MovieList component
Now we will create a MovieList component that receives a list of movies and
displays it. Such components are called presentational components - they don't
worry about how the data was obtained, their job is to simply render it.
We will generate the MovieList component using the component generator
provided by the Next.js plugin. Follow the steps below:
npx shaper
? Which plugin would you like to run? Next.js
? Which generator would you like to run? component
? Component name? MovieList
? Which workspace should this go to? apps/movie-magic-nextjs
? Parent directory within workspace? src/components/MovieList
A placeholder MovieList component has been created for you. Also a placeholder
Storybook story has been created. Let's implement MovieList interactively
using Storybook.
npm run storybook
Point your browser to http://localhost:6006. Storybook shows the placeholder
implementation of MovieList.
Implement the MovieList component
We are now ready to implement the real MovieList.
- Create the data to render movies. Copy the
movies.tsfile from the completed example into yourapps/movie-magic-nextjs/src/mocksfolder. - Overwrite the placeholder implementation of
MovieListatapps/movie-magic-nextjs/src/components/MovieList/MovieList.tsxfrom the completed example. - Overwrite the placeholder story for
MovieListatapps/movie-magic-nextjs/src/components/MovieList/MovieList.stories.tsxfrom the completed example.
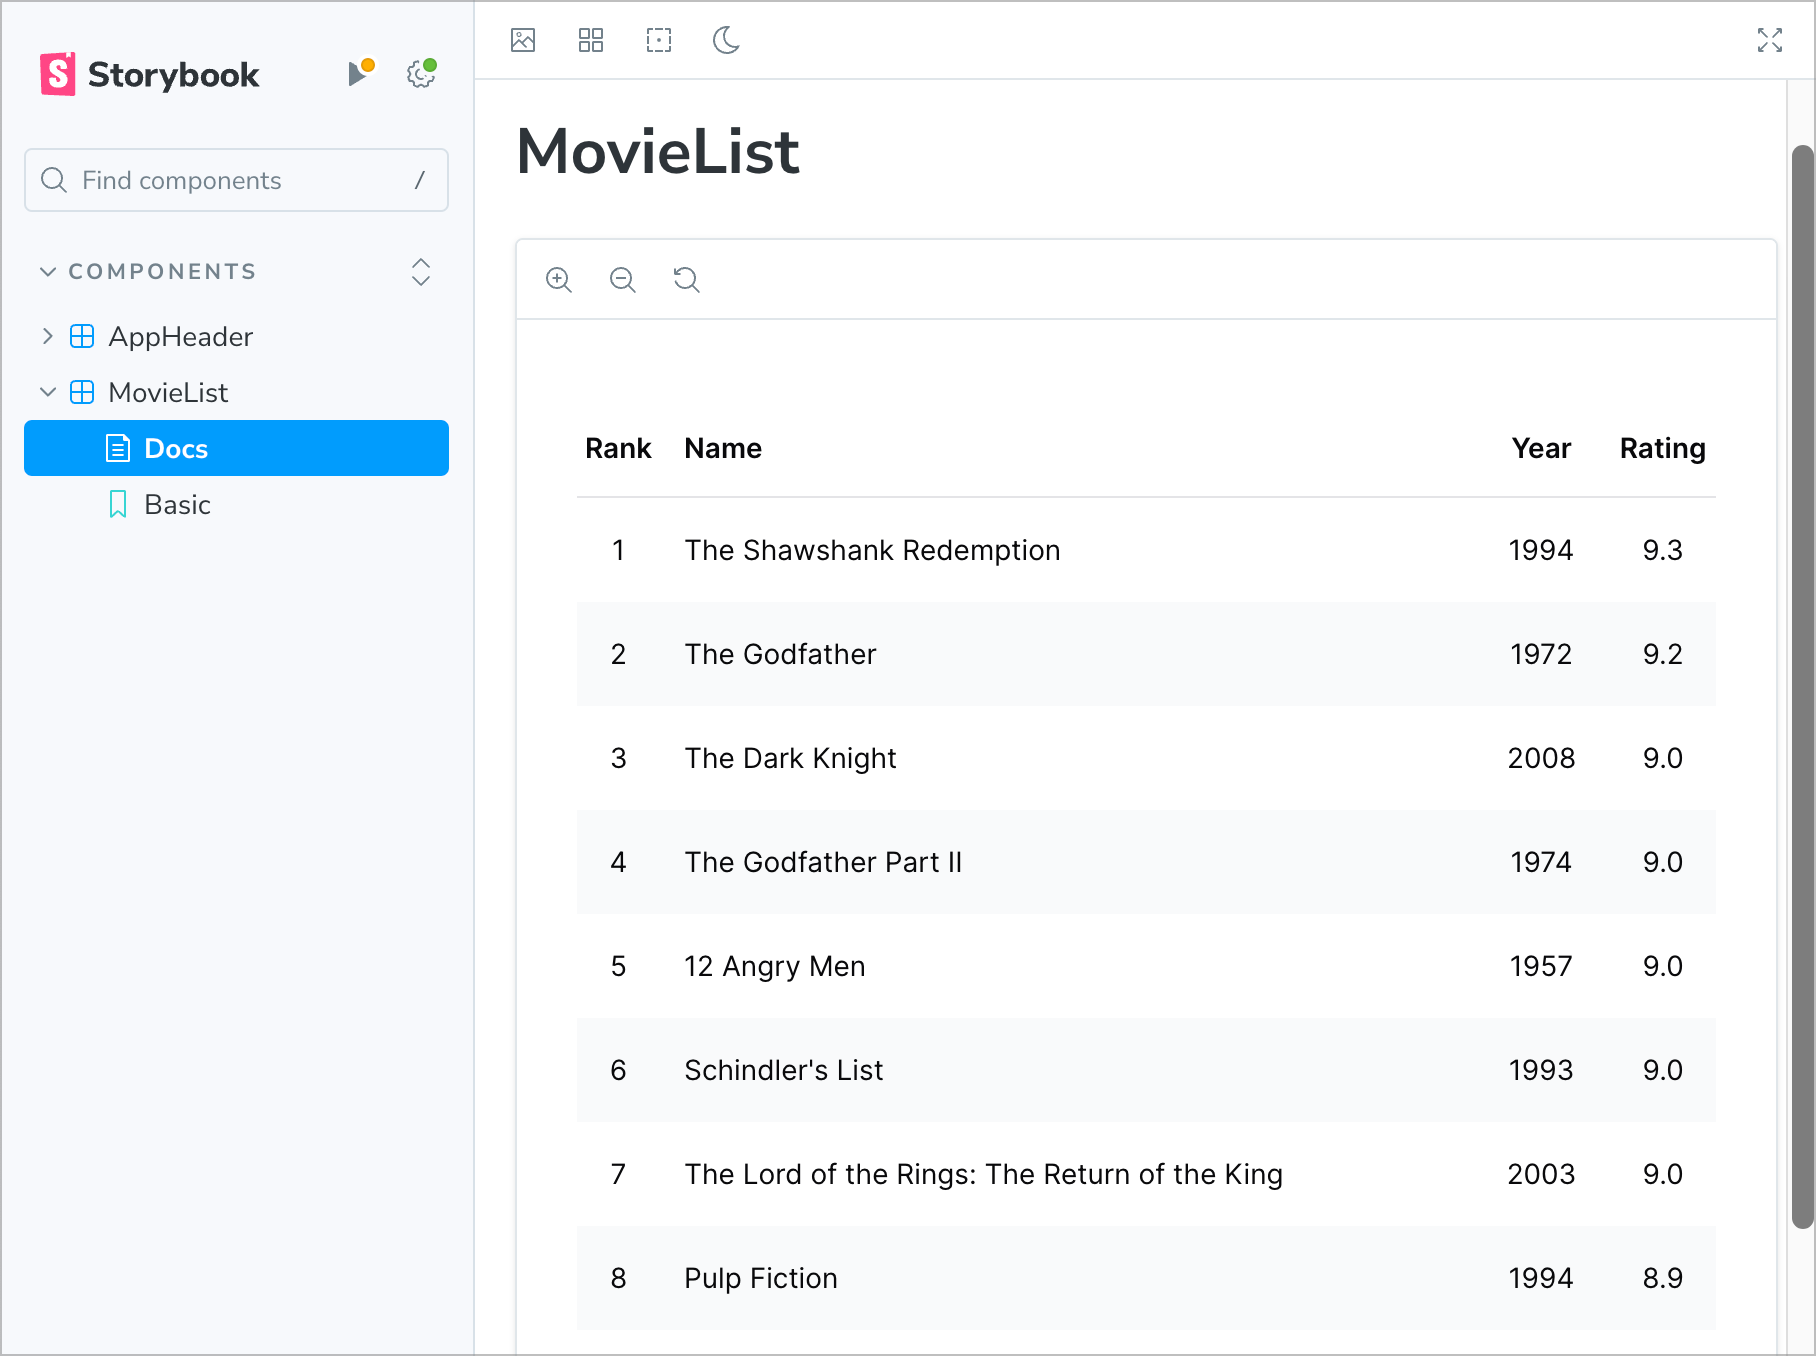
Here's a snapshot of the final Storybook story.
You may need to restart Storybook in case TailwindCSS did not recompile the CSS automatically.
Test the MovieList component
It's good to write unit tests for our components to ensure that:
- they are working correctly,
- they keep working correctly when any code in your repo changes.
Let's write a unit test for the MovieList component. This one ensures that it
renders the correct number of movies. You can find more best practices for unit
testing in
React Testing Techniques.
Overwrite the placeholder test for MovieList at
apps/movie-magic-nextjs/src/components/MovieList/MovieList.test.tsx from
the completed example.
Run the tests from the root directory. All tests should pass.
npm test
MovieList is now fully implemented, let's commit the code:
# Commit
git add .
git commit -m "feat: add MovieList"
Mock API request
Now that we have implemented the MovieList component, we need to fetch a list
of movies from some server and feed it to MovieList. However, before fetching
from a real server, we will fetch it from a mock server. This will allow us to
test our app independent of a real server. To do this, we will use a tool called
Mock Service Worker (MSW). MSW intercepts API requests at
the network level and returns mock responses.
Replace the placeholder content in
apps/movie-magic-nextjs/src/mocks/handlers.ts from
the completed example.
Now create a file called api.ts under apps/movie-magic-nextjs/src/utils (you
will have to create the utils directory). Add the following content to this
file. It sets up an axios instance that
we will use to fetch data from the real or mock server.
import axios from 'axios';

// Create an axios instance
export const api = axios.create();
Setup Tanstack React Query
In addition to Axios, we'll setup
Tanstack React Query to make REST calls. This is
done by creating a QueryProvider and adding it near the root of our component
tree.
Copy the QueryProvider.tsx file from
the completed example
into your apps/movie-magic-nextjs/src/providers folder.
Now add QueryProvider near the root of our component tree. To do this edit
AppProvider.tsx under apps/movie-magic-nextjs/src/providers as shown below:
'use client';

+ import { QueryProvider } from './QueryProvider';
import { useMockServiceWorker } from './useMockServiceWorker';

...

-  return <>{children}</>;
+  return <QueryProvider baseApiUrl={baseApiUrl}>{children}</QueryProvider>;
}
Update HomePage to fetch movies
We now have all the REST infrastructure set. Let's use it to fetch data from the
mock server and show it on the home page. Replace the entire content of
apps/movie-magic-nextjs/src/app/page.tsx from
the completed example.
Now run the following command in the root directory of your repo. You should see the app running in your browser (http://localhost:3000/) showing the list of top 10 movies.
npm run dev
Commit your code
# Commit
git add .
git commit -m "feat: add MovieList to the home page"
Congratulations! You have successfully built a Next.js web application from scratch in just a few minutes. This is the power of Code Shaper.